Gatekeeper & Policies
OPA Gatekeeper is a policy enforcement engine for Kubernetes. SRExpert provides a visual interface to create, manage, and monitor Gatekeeper policies across your clusters.
Prerequisites
Before creating Gatekeeper policies, you need to install the Gatekeeper Helm Chart in your cluster.
Installing Gatekeeper
- Navigate to Helm Charts in the sidebar
- Select the Custom tab
- Find the gatekeeper chart
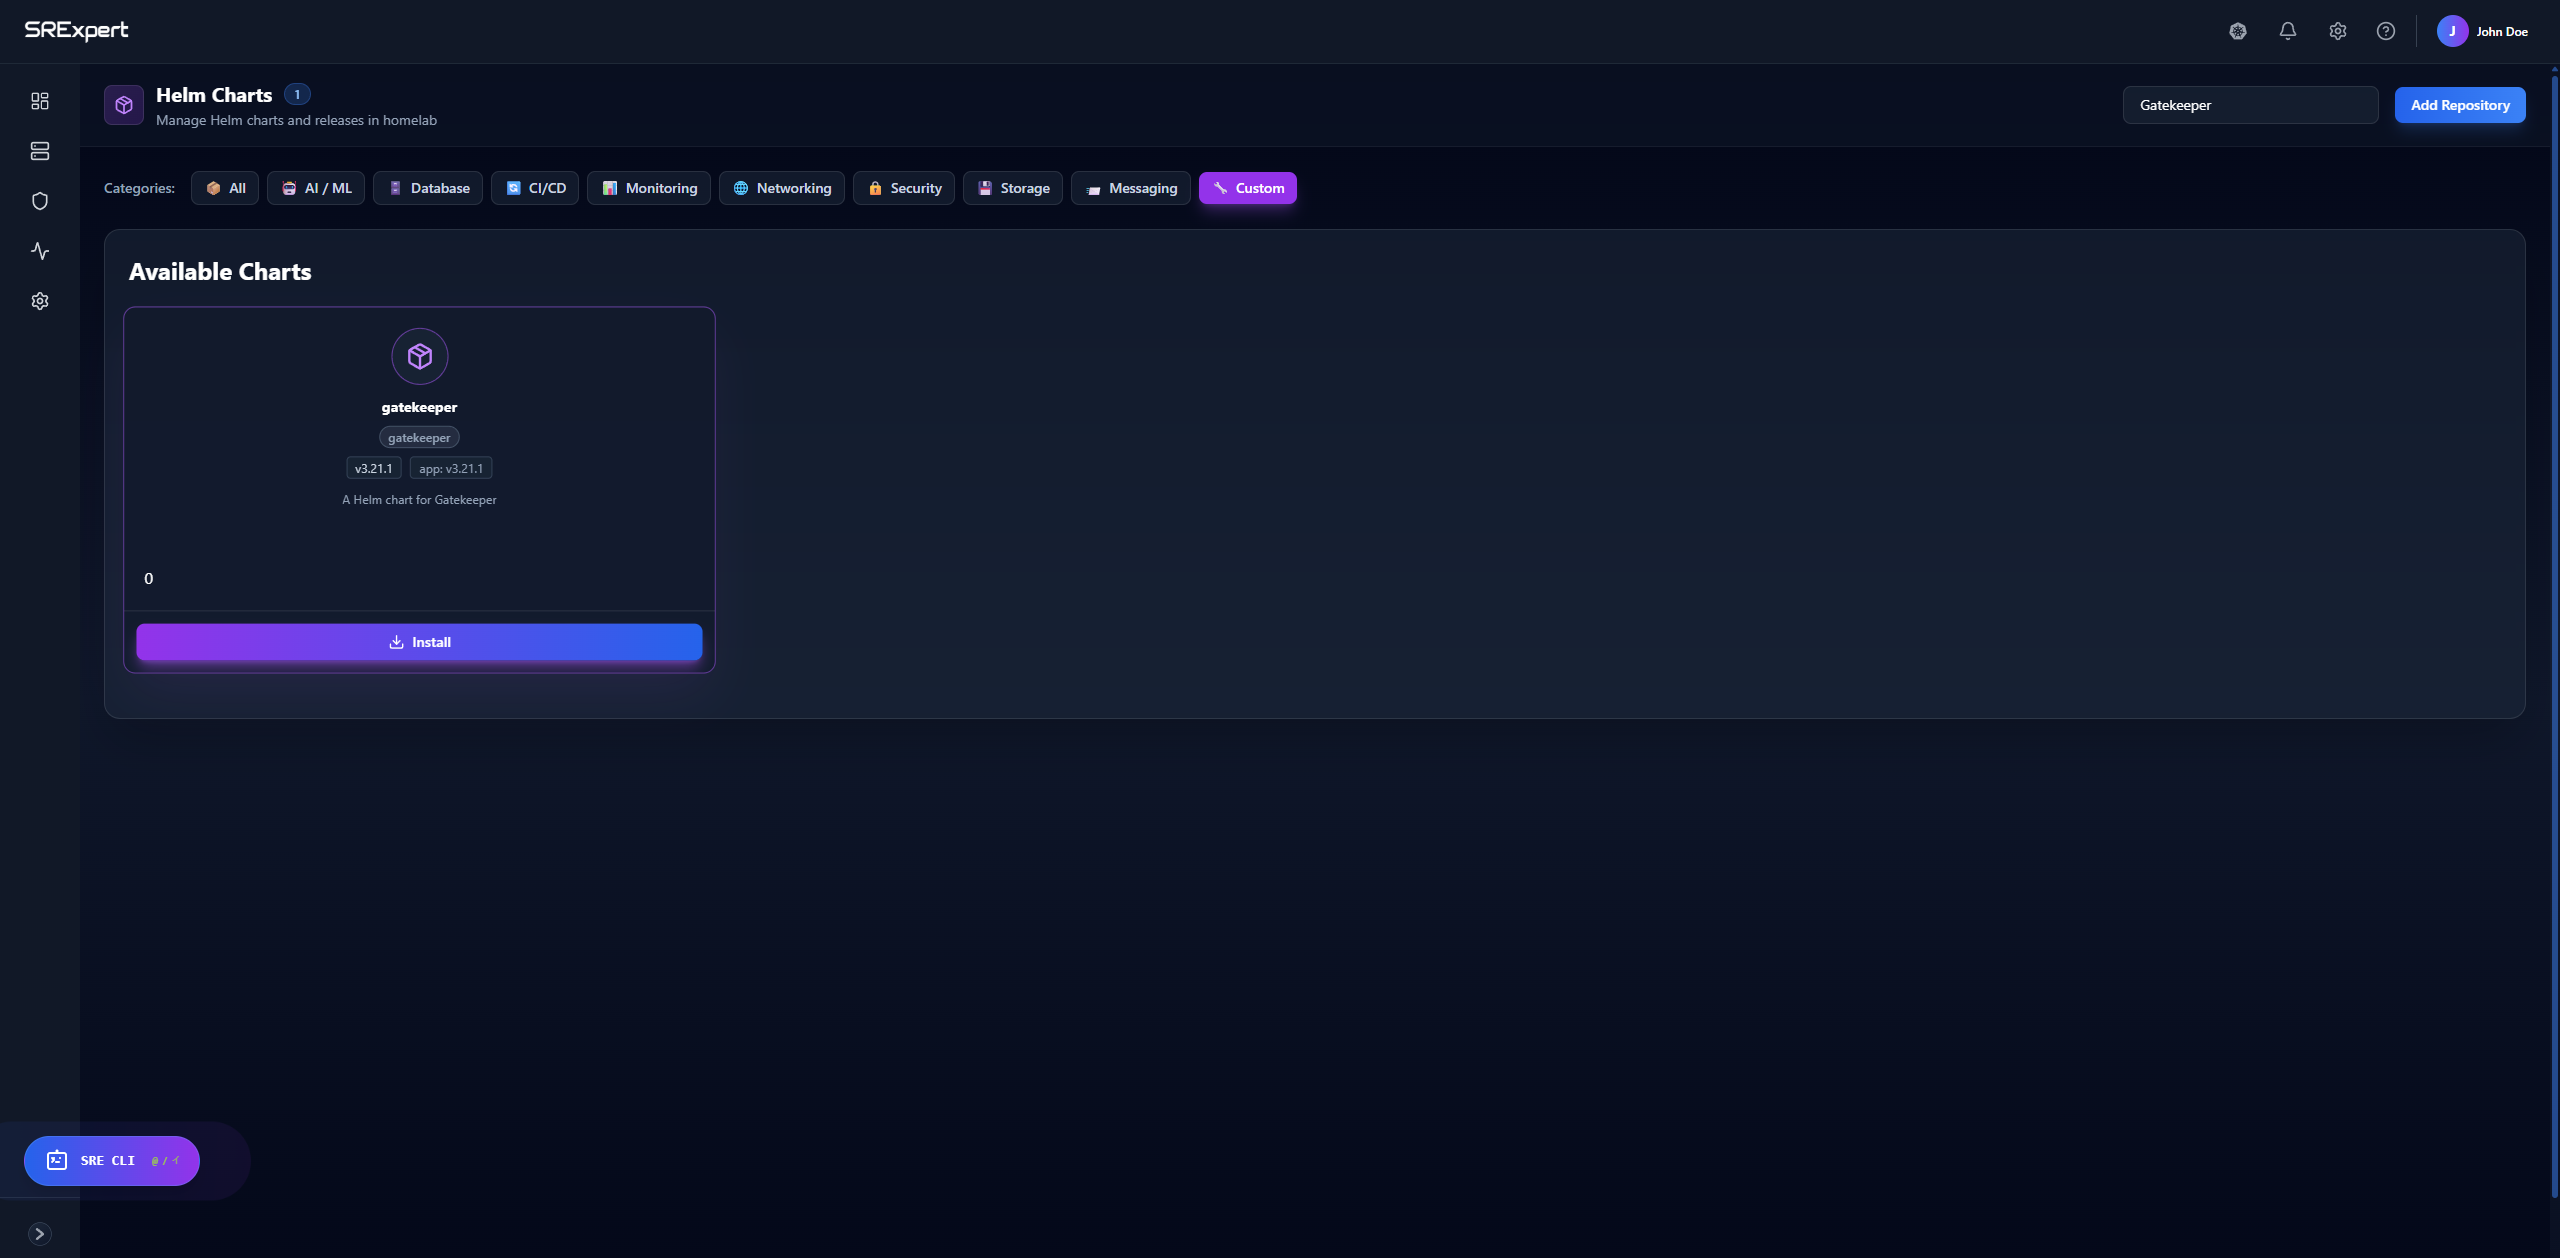
- Click Install and configure with default values (or customize as needed)
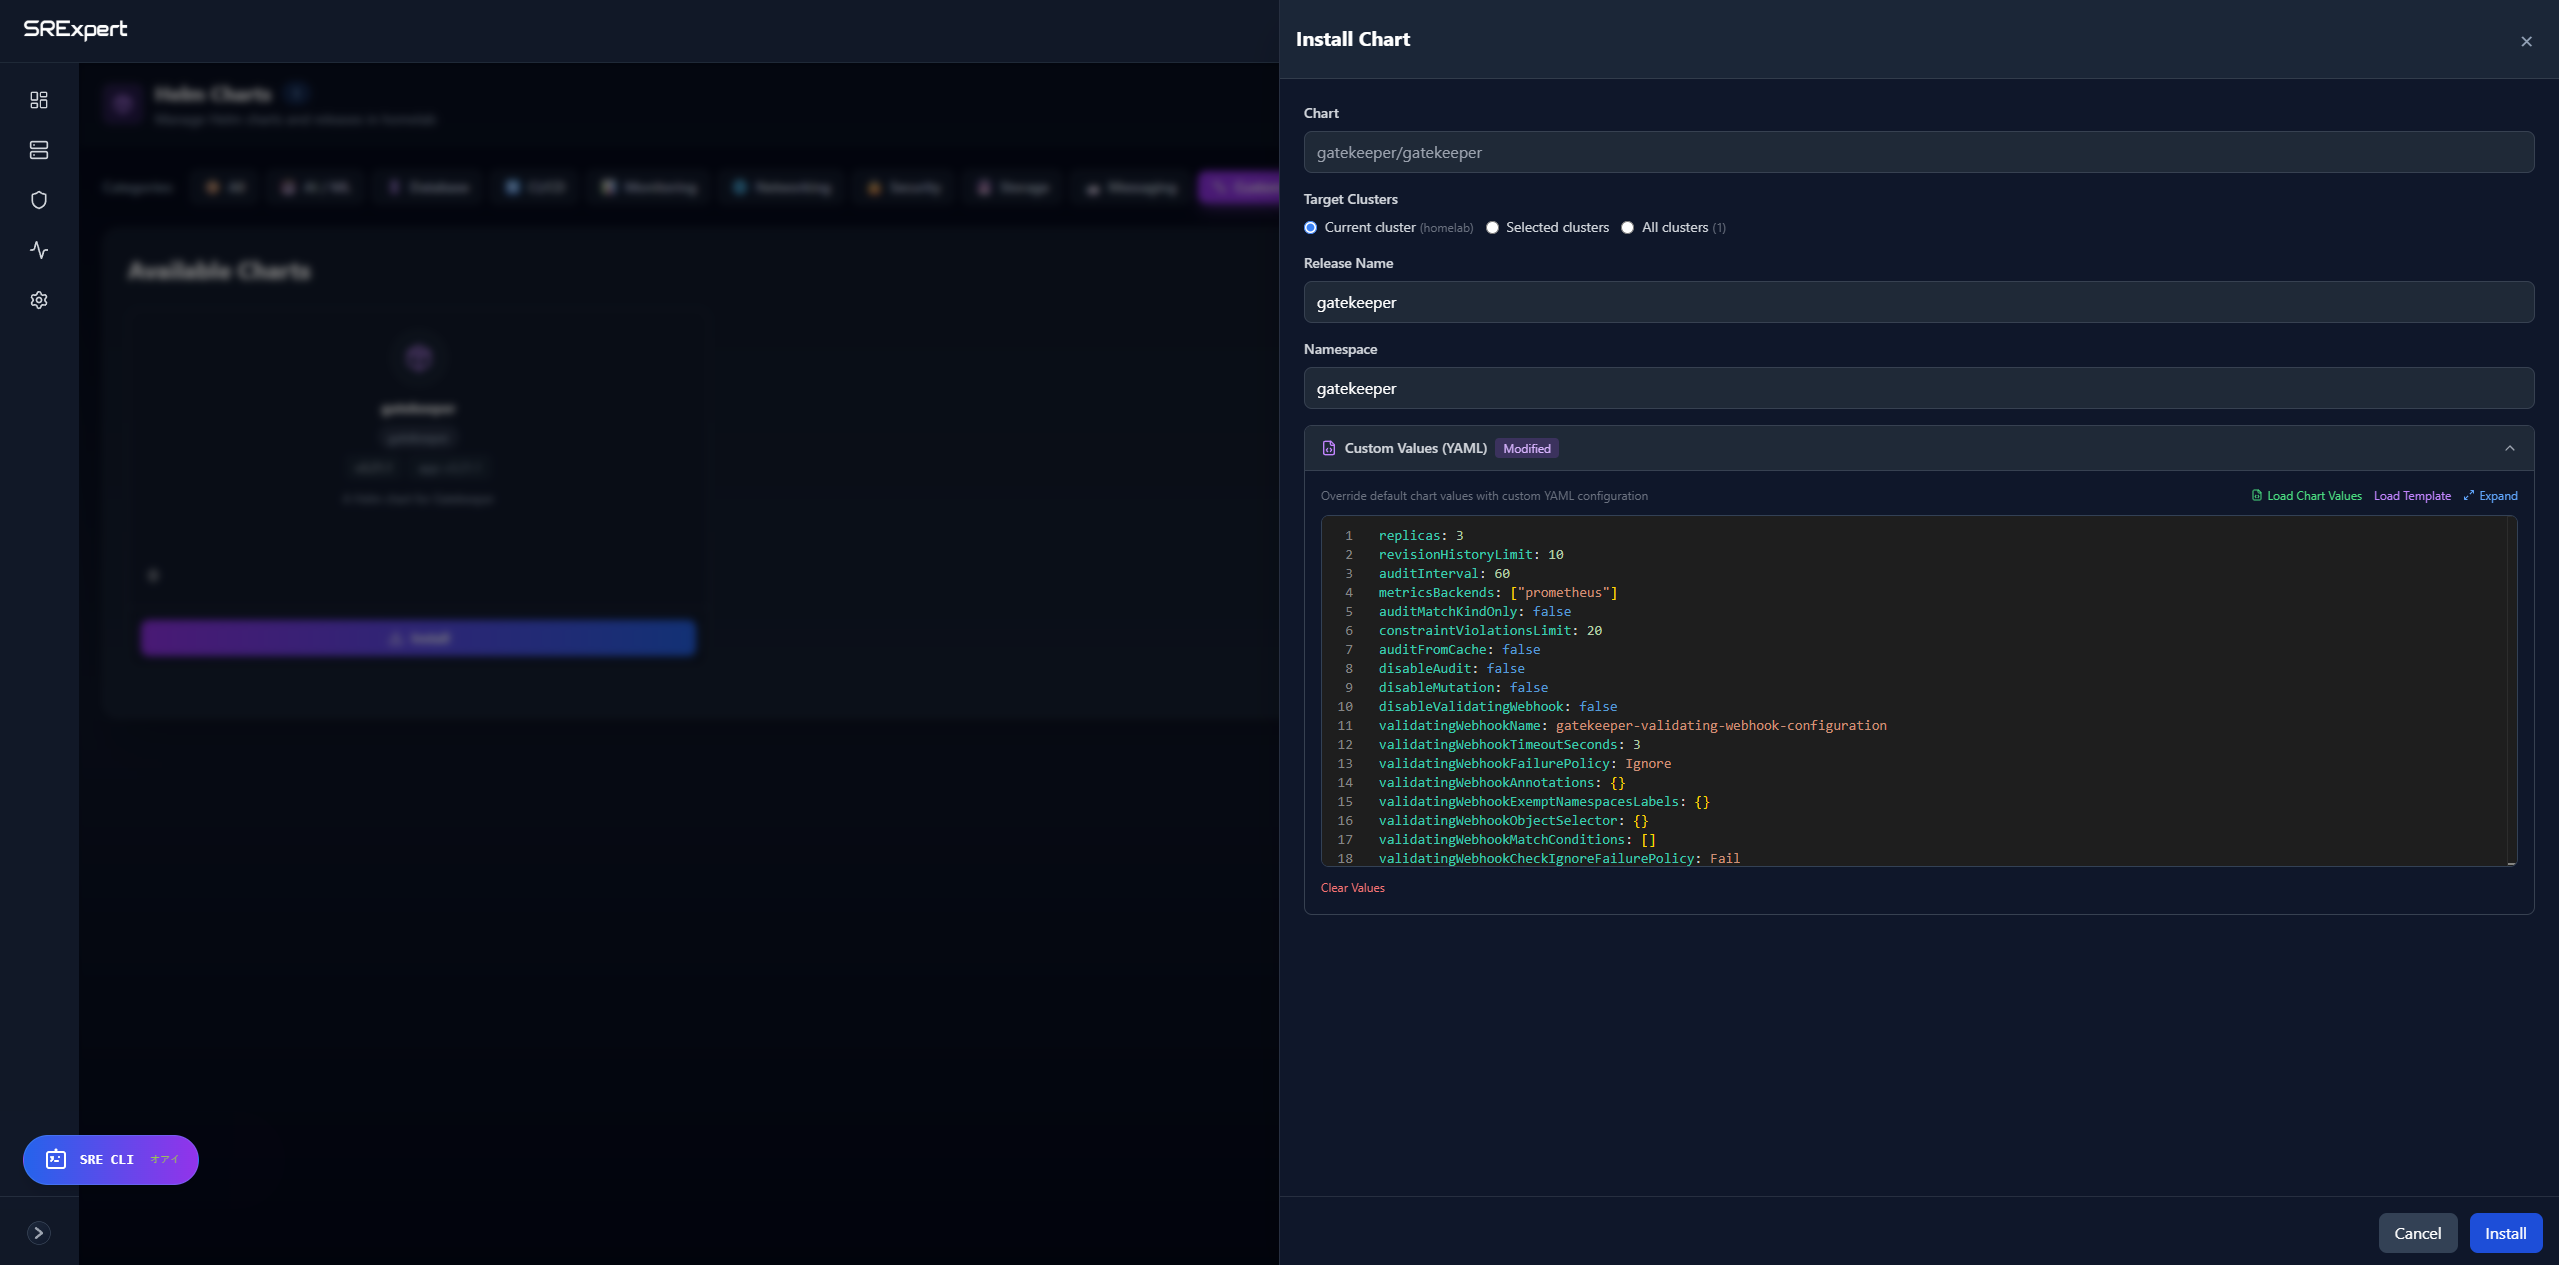
- Wait for the installation to complete. The Gatekeeper pods will be deployed in the
gatekeeper-systemnamespace.
Overview
Once Gatekeeper is installed, navigate to Security > Policy Management to access the policy management interface. The Gatekeeper Policies view lives under this section, alongside two sibling pages:
- Admission Control — review and configure admission webhook behavior
- Policy Templates — manage reusable Constraint Templates
Gatekeeper uses Constraint Templates to define reusable policy logic and Constraints to apply those policies to your clusters. SRExpert simplifies this process with a visual interface that lets you:
- View all active policies and their status
- Monitor policy violations in real-time
- Create new policies from pre-built templates
- Edit and delete existing policies
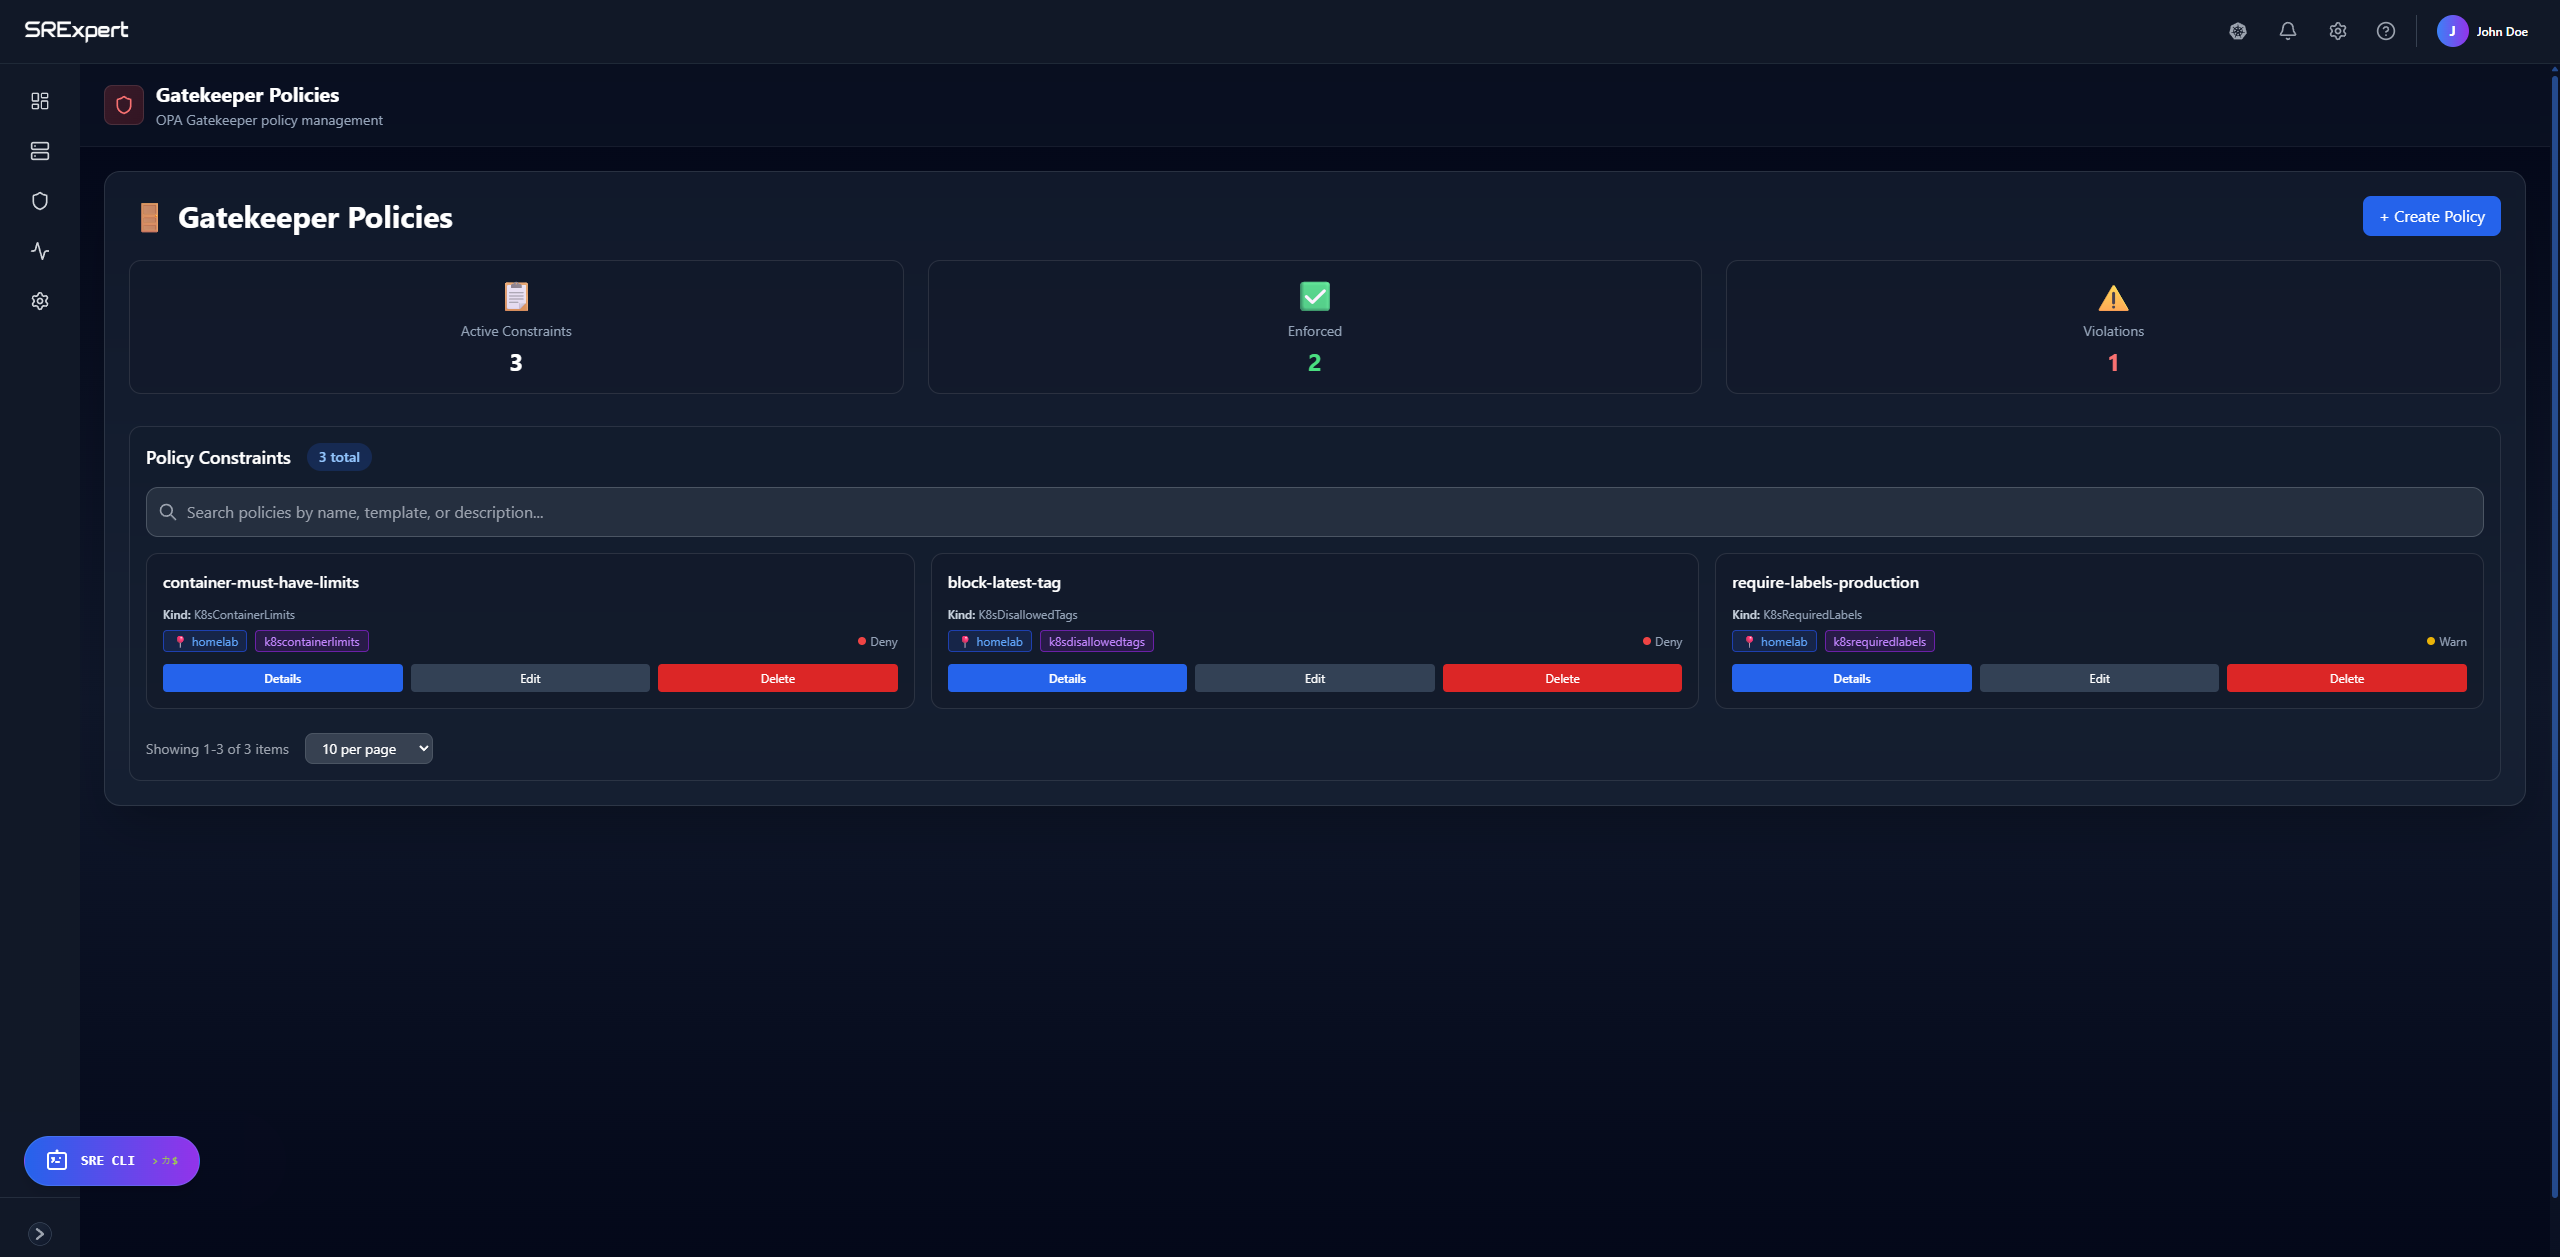
Dashboard Metrics
At the top of the Gatekeeper Policies view, you’ll see inline badges summarizing your policies:
| Metric | Description |
|---|---|
| Active Constraints | Total number of policies currently deployed |
| Enforced | Policies that block non-compliant resources (Deny mode) |
| Warn | Policies running in Warn mode (log only, no blocking) |
Managing Policies
Viewing Policies
Policies are listed in a table. You can filter the list with the search box (“Search policies by name, template, or description…”) at the top of the view. The table has the following columns:
| Column | Description |
|---|---|
| Policy | The constraint name (e.g., require-labels-production) |
| Template | The Constraint Template type (e.g., K8sRequiredLabels) |
| Cluster | Which cluster(s) the policy applies to |
| Status | Deployment status of the policy (see Policy status below) |
| Enforcement | Warn, Deny, or Dryrun enforcement badge |
| Violations | Number of resources violating the policy |
| Actions | Row actions available via the ⋮ (3-dot) menu |
The ⋮ (3-dot) actions menu for each row lets you:
- Details: View full policy configuration
- Edit: Modify policy settings
- Delete: Remove the policy
Policy status
A policy can target multiple clusters, so its status is tracked per cluster. The Status column summarizes the deployment state — for example, an X/N applied badge shows how many of the targeted clusters currently have the constraint applied. Per-cluster states include:
| State | Meaning |
|---|---|
applied | The constraint is deployed and active on the cluster |
not_applied | The constraint has not been deployed to the cluster |
failed | Deployment of the constraint failed |
partial | The constraint is applied to some, but not all, targeted clusters |
drift | The constraint is missing or has diverged from the desired state |
pending | Deployment is in progress |
A built-in drift reconciler continuously re-applies missing constraints, restoring policies that have drifted from their desired state.
Viewing Violations
Click on a policy row or open the ⋮ menu to see:
- Which resources are violating the policy
- The specific violation message
- Namespace and resource type
- When the violation was detected
Creating a Policy
Click + Create Policy to open the creation form.
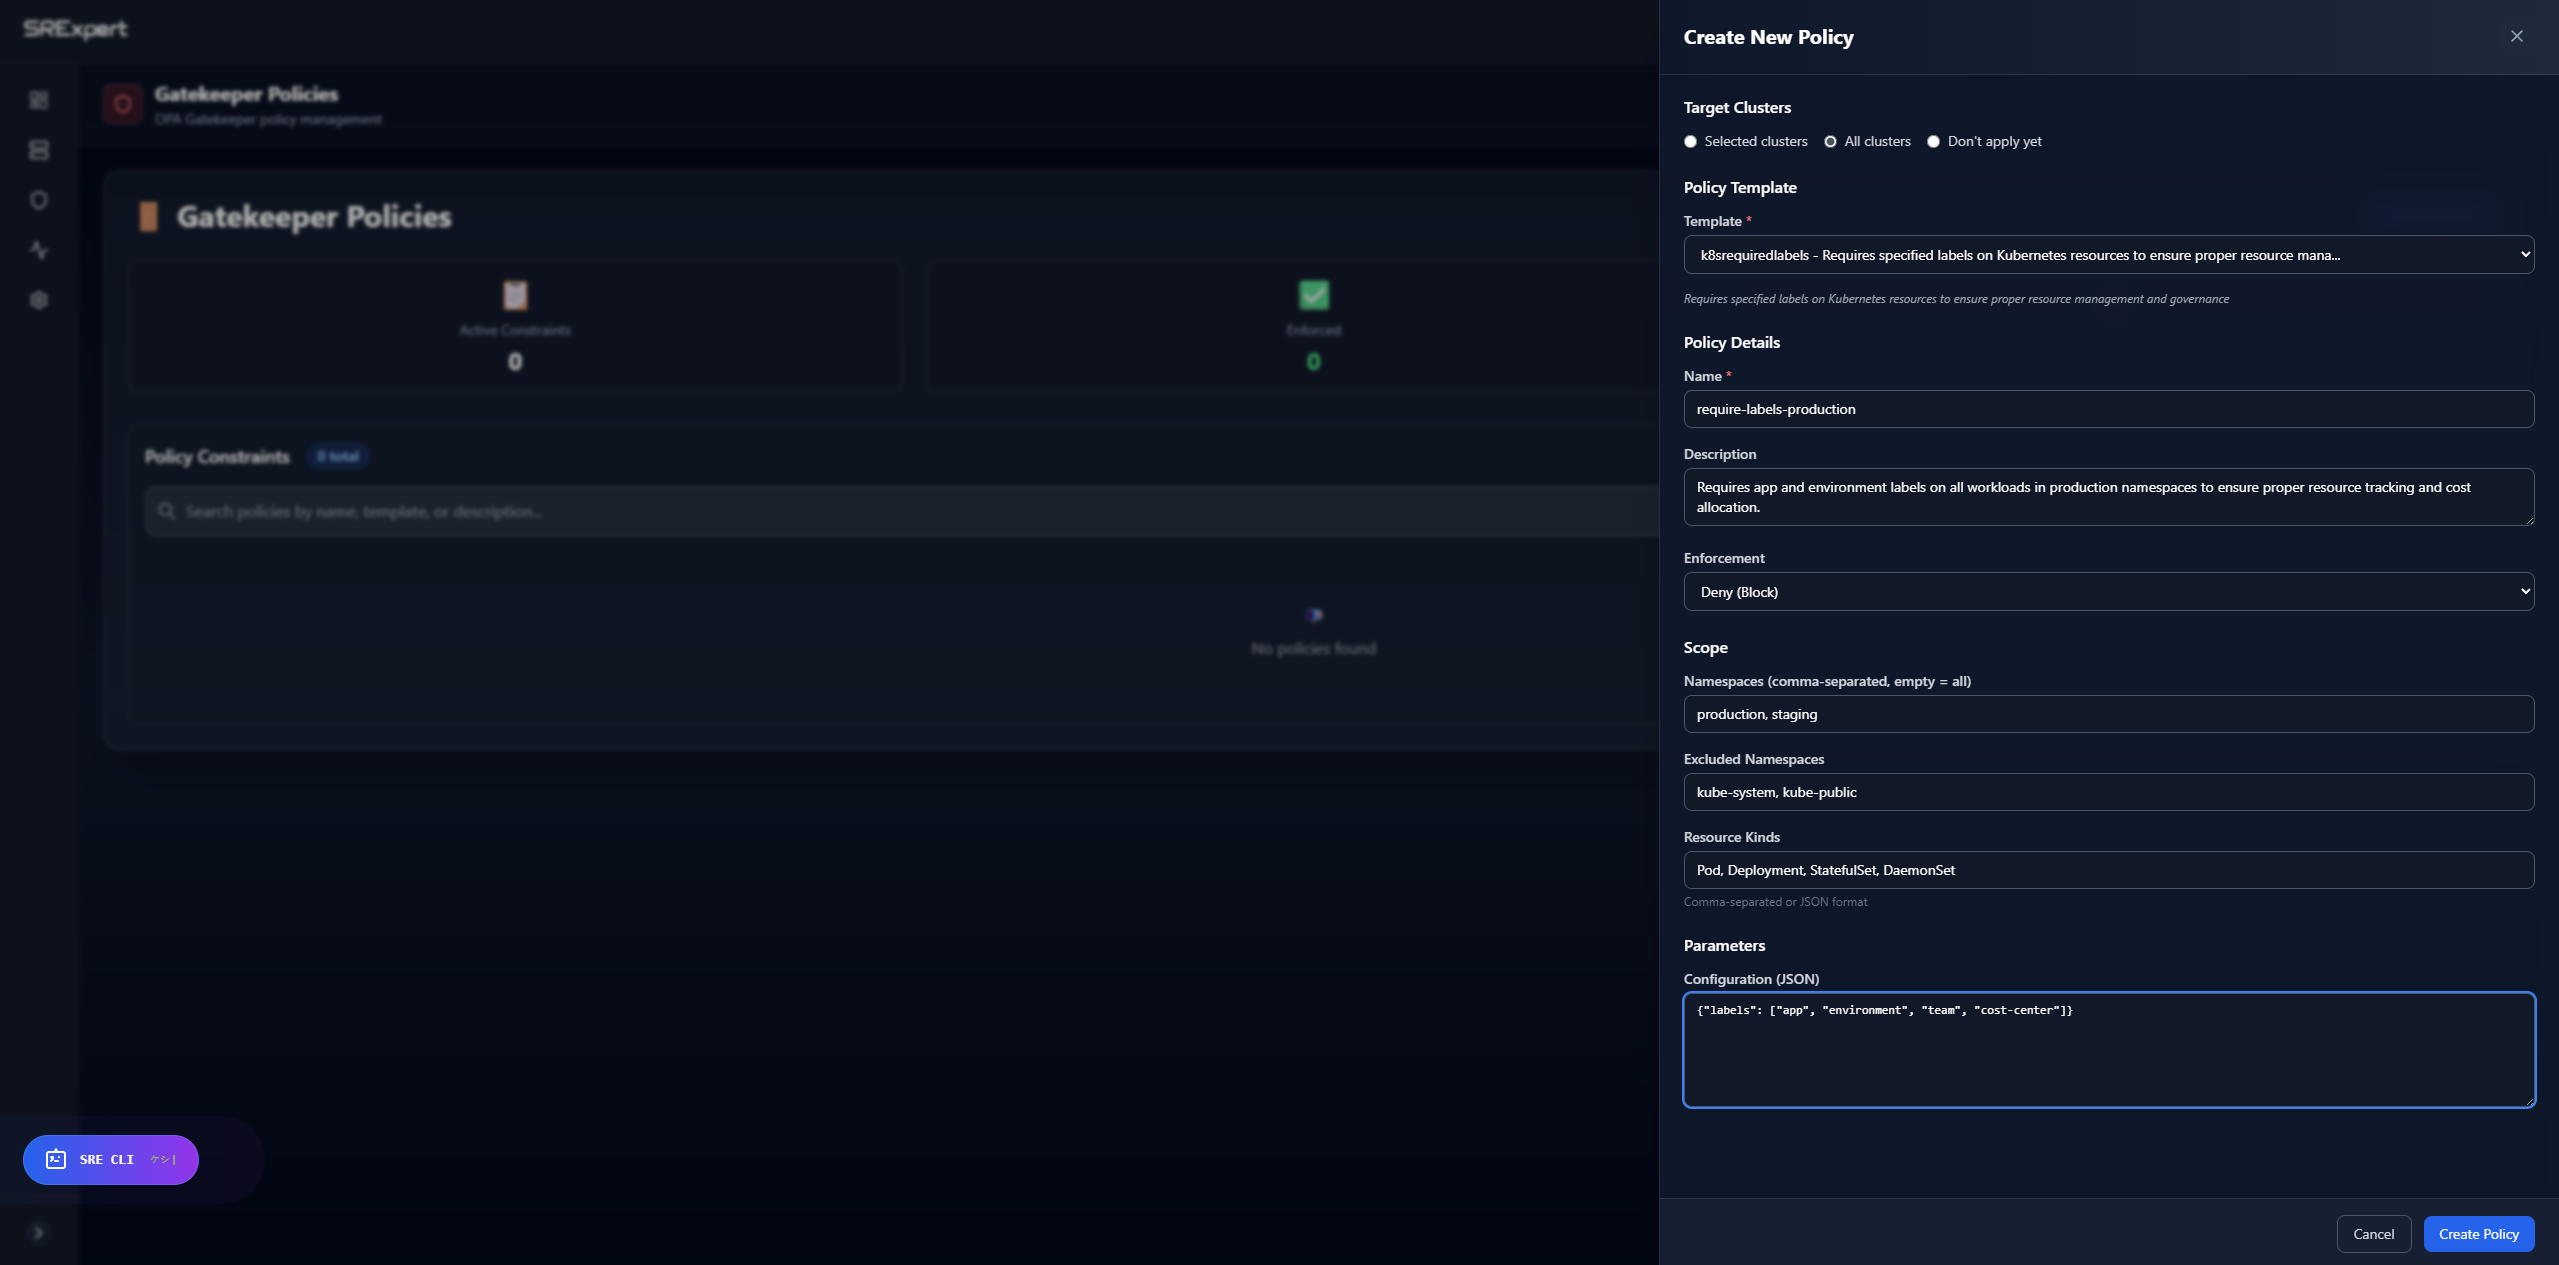
Step 1: Target Clusters
Choose where to apply the policy:
- Selected clusters: Pick specific clusters from the dropdown
- All clusters: Apply to every connected cluster
- Don’t apply yet: Save the policy without deploying
Step 2: Policy Template
Select a pre-built template from the dropdown. Common templates include:
| Template | Purpose |
|---|---|
K8sRequiredLabels | Require specific labels on resources |
K8sContainerLimits | Require CPU/memory limits on containers |
K8sAllowedRepos | Restrict container images to approved registries |
K8sDisallowedTags | Block specific image tags (e.g., latest) |
K8sBlockLoadBalancer | Prevent LoadBalancer service creation |
K8sBlockNodePort | Prevent NodePort service creation |
K8sHttpsOnly | Require HTTPS for ingress resources |
Step 3: Policy Details
- Name: A unique identifier for the constraint (e.g.,
require-labels-production) - Description: Explain what this policy enforces
- Enforcement:
Warn (Log only)- Log violations but allow the resourceDeny (Block)- Block non-compliant resources from being createdDryrun- Evaluate the policy and record violations without blocking or warning
Step 4: Scope
Define which resources the policy applies to:
- Namespaces: Comma-separated list (empty = all namespaces)
- Excluded Namespaces: Namespaces to skip (e.g.,
kube-system, kube-public) - Resource Kinds: Which resource types to check (e.g.,
Pod, Deployment, StatefulSet)
Step 5: Parameters
Configure template-specific parameters in JSON format. For example:
K8sRequiredLabels:
{
  "labels": ["app", "environment", "team"]
}
K8sAllowedRepos:
{
  "repos": ["gcr.io/", "docker.io/", "quay.io/"]
}
K8sDisallowedTags:
{
  "tags": ["latest", "dev"]
}
Editing and Deleting Policies
- Open the ⋮ (3-dot) actions menu on any policy row and choose Edit to modify its configuration
- Choose Delete from the same menu to remove a policy (this will stop enforcement immediately)
Best Practices
- Start with Warn mode: Test policies in warning mode before switching to Deny
- Exclude system namespaces: Always exclude
kube-systemandkube-public - Use descriptive names: Make policy names clear and searchable
- Monitor violations: Regularly check the dashboard to catch policy violations
- Document your policies: Use the description field to explain the policy’s purpose
- Apply incrementally: Start with a few critical policies and expand over time